Ensure EBS Volumes are Encrypted at Rest with CMK

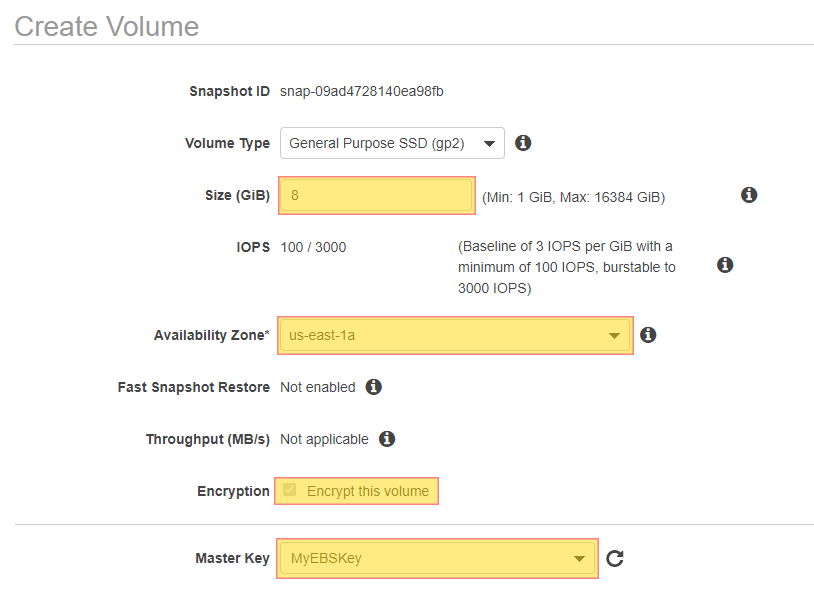
Elastic Block Store (EBS) volumes are directly connected to your compute instances. They are treated as data disks or operating system disks. Sensitive data may be housed on your EBS volumes and this is why it is a security best practice to ensure your data is encrypted at rest with a Customer Managed Key. This will also help you with NIST, HIPPA, GDPR & PCI-DSS compliance.

Audit & Remediation

  • Login into your AWS account
  • Navigate to the EC2 service at: https://console.aws.amazon.com/ec2
  • On the EC2 Dashboard in the main panel, Under Resources select the Volumes link.


  • In the main panel you have a list of all your volumes. Under the Encryption column you see the current status. If listed as Not Encrypted you are not enforcing encryption.
  • In the main panel you have a list of all your volumes. Under the Encryption column you see the current status. If listed as Encrypted and under KMS Key Alias you see aws/ebs you are not using a Customer Manged Key (CMK).


  • At the top left corner of the page, select Actions then choose Create Snapshot. Make note of the Size and the Availability Zone that your active volume is currently residing in.


  • In the left panel, under Elastic Block Store select Snapshots.
  • Select the snapshot that you created in the previous step, then select Actions then Create Volume.


  • Under Create Volume set the Size to correspond to that noted in the previous step.
  • Select the Availability Zone that was noted in the previous step.
  • Select the Encryption check box next to Encrypt this volume.
  • Next to Master Key select an encryption key that is NOT aws/ebs and one that you have created in the KMS service.


  • In the left hand panel, under Elastic Block Store select Volumes.
  • with your list of volumes, select the volume that you took the snapshot from and make note of the Attachment Information under the Description tab in order to get InstanceID and VolumeName.


  • Navigate to Instances under Instances in the left hand pane.
  • Select the Instance that you made note of in the previous step and select Actions, Instance State, Stop Instance.
  • Navigate back to Volumes under Elastic Block Store and select the volume that we have been referencing.
  • In the upper left corner select Actions then choose Detach Volume.


  • Select the newly created volume that was re-created with Encryption enabled.
  • In the Upper left corner choose Actions and choose Attach Volume.


  • Select the Instance that you have noted from previous steps.
  • Set the Device to use the same name that it was set to previously.
  • Repeat steps for each volume that you have listed as Not Encrypted.
  • Repeat steps for each Region that you have volumes in.
  • Repeat steps for each AWS account that you have.
See all of your AWS EC2 Instances in a single place!

Do you want to see all of your AWS EC2 Instances in once place for all regions and all accounts?
Login to our online demo to see exactly what this looks like.
demo.intelligentdiscovery.io


Other Key Features

Inventory

Consolidate your inventory management with consistent and frequent security logs, inventories, and change logs. Dashboard reporting for extensive analytical value.

learn more +

Cost & Usage

Access consolidated capacity, cost, and volume tools in a scaling environment without impacting production or breaking the bank.

learn more +